
for Windows
Version 2.3
User Manual
| |
for Windows |
|
|
Version 2.3
User Manual |
© BIT-Software Switzerland/Curaçao, 2009-2020
Used icons
This documentation uses the following icons to mark special locations:
| |
Special Note. |
| |
Tip for users. |
| |
Warning to be observed! |
| |
The functions marked with this icon are
available only for registered users!
It may therefore quit be worth for you, to register as a user with a small (or even large) donation! |
| With a slightly larger donation, you register as a Premium
User and also get access to the expanded range of functions
starting from version 2.0. All functions marked with this symbol are only available to Premium Users! |
Table Of Contents
SongBook is the ultimate replacement for your big and fat office folder with houndreds of lead sheets. You can say that SongBook is the Swiss Army Knive stage software for all kind of musicians and singers.
Are you tired of towing a fat folder full of lyrics and scores to
every gig you make!
With the actual PC technology it should be possible to put all that stuff
into a small Notebook (or even a Netbook) and call it like lightning as
you need it.
This is exactly where SongBook comes in place. This software has all you need to do your job on the stage:
Display lyrics and score sheets like a clip. The leadsheets can be supplied as bitmap so the can also contain graphics,
Karaoke function. The lyrics are taken
directly from the MIDI-Files and displayed on the screen, highlighting
the actual position.
Even chords can be displayed if they are part of the MIDI file as
lyric events.
FINALLY: Lyrics display and Karaoke function can be displayed
simultaneously in separate windows (2 window mode)!
Controllable via MIDI-IN with MIDI SYSEX commands.
MIDI File player synchronous to the lyrics display.
Audio File layer synchronous to the lyrics display.
MP3 player for your breaks.
Free configurable MIDI filter and port
mapper. Dispatches data received on the MIDI IN interface to any MIDI
OUT port you wish. On each MIDI OUT port you can determine, what data
should be transmitted to this port. Additionally you can transpose
MIDI NOTE events received individual to each MIDI OUT port.
The port mapper is inactive while playing a MIDI file from within SongBook!
Calendar with notepad to manage your gigs.
Create and recall set lists on the fly.
Jingle player.
Operational with mouse, touch screen or keyboard, especially with external numeric keypad.
The program can be run directly from a memory stick or card.
Multi language support.
By supplying separate editable language files nearly every language
can be realized for the user interface.
OK, you might need somebody to translate the text fragments.
The manual itself is available only in German and partially in English
(I'm working on it).
But anyway: most parts of the software are self explanatory
|
|
SongBook is no MIDI file archive with houndreds of free MIDI files! They must be supplied by yourself. |
|
|
SongBook is no recording software to record own sequences. |
To run SongBook you can use any PC (Desktop, Notebook, Netbook,
Table-PC) running Microsoft Windows 7, 8
or 10. There are no special needs in performance. An Intel Atom
running 1.6 GHz is absolutely capable of running this piece of software.
To answer the question in advance:
No, there is no Linux version and:
No, there is also no Linux version planned!
For stage usage we recommend a NetBook with 8.9" screen size or bigger or a Tablet-PC with touch screen (best choice).
To increase the comfort in operating SongBook with Netbooks we
recommend to use a separate numeric keypad.
This is of course not necessary (but also possible) if you have a touch
screen.
When you want to use the MIDI functionality of SongBook (MIDI file player, MIDI filter and port mapper) you will need a MIDI Interface (e.g. USB MIDI cable),
The software itself is written in native C/C++ and needs no special runtime environment, neighter .NET not Java Runtime Engines or any other of that horrible stuff. Therefore it is very small and compact.
If you want to be sure to get the actual version you can download it
at
www.bit-software.org.
Just navigate to the download page and download the ZIP archive.
Then extract the contents of the ZIP archive to any folder on your hard
disk and you are ready to go.
There is no need for an installation process.
Just extract the files in the SongBook.zip archive to your hard disk or memory stick and execute SongBook.exe. Of course you can add a link to SongBook.exe on your desktop to start it with a double click.
On a dedicated stage PC it might be a good idea to add a link to SongBook.exe in the startup folder to start SongBook automatically with Windows.
OK, so if you really want to uninstall SongBook just remove the folder from your PC. There are no hidden registry entries or spy tools.
After selecting Options -> Sprache/Language in the main menu a dialog will be displayed showing all available language files.
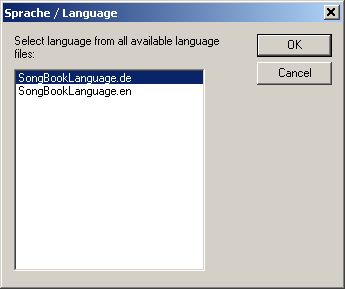
Just select the appropriate language and click OK.
All text fragments used in SongBook
are stored in so called language files. The files are named SongBookLanguage,
followed by a extension indication the language stored in this file (e.g.
SongBookLanguage.en for English).
To make SongBook available for a new language you just have to
find somebody to translate all the text fragments from any available
language file to the new language. The new language file must have a
unique extension describing the language.
The files can be edited with any common text editor (e.g. Windows
Notepad). Take care to keep the translated text fragments as short as
possible so they can be displayed completely in the respective fields on
the screen.
The new language file must now be saved in the SongBook
installation folder and can now be selected as new language in Options
-> Sprache/Language..
After installing and starting SongBook it is recommended to configure the software to your needs..
To to that job select Settings from within the Options menu.
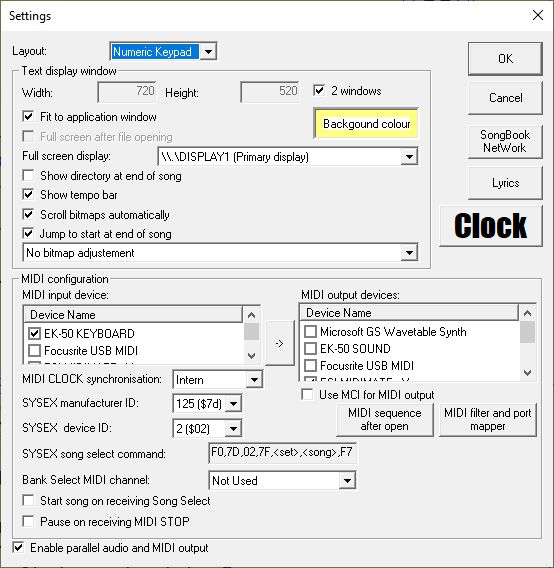
| Layout | Select the layout you prefere. There are 2 layouts available:
|
||||||||||||||||||||||||||||||||||||||||||||||||
| 2 windows |
Activates/Deactivates the 2 Window mode. In this operation mode the bitmap resp. TXT or RTF file and the MIDI lyrics (Karaoke) will be displayed simultaneously in 2 separate windows. The windows can be positioned and sized for your own convenience by placing the mouse cursor on any border of a window and drag the border to the desired position while pressing and holding the left mouse button. |
||||||||||||||||||||||||||||||||||||||||||||||||
| Width and Height |
At this place you can define the size of the screen displaying and
scrolling down the bitmap files. The values are given in pixels. |
||||||||||||||||||||||||||||||||||||||||||||||||
| Fit to application window |
If this option is activated the display screen size will automatically be adjusted to the applications main window. | ||||||||||||||||||||||||||||||||||||||||||||||||
| Full screen after file opening |
Extends the display screen to full screen when a song is opened to play. While in full screen mode the keyboard is fully functioning.
|
||||||||||||||||||||||||||||||||||||||||||||||||
| Show directory at end of song |
Check this option to display the song directory when a song ends. Now you can select the next song easily. | ||||||||||||||||||||||||||||||||||||||||||||||||
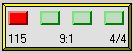
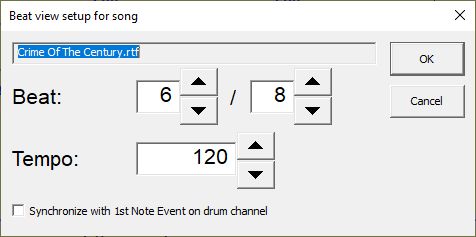
| Show tempo bar |
Check this option to display the tempo bar. By double clicking the tempo bar window a dialog will be displayed which enables to set the tempo and the beat count for the actual loaded song. The values set will be stored with the song and restored on reopening the same song.
|
||||||||||||||||||||||||||||||||||||||||||||||||
| Scroll bitmaps automatically |
With this option activated the leadsheets will automatically start
to scroll down when a song starts. However by deactivating this option you can achieve hat the leadsheet will stay at the starting position and you can scroll by hand with he cursor keys, the mouse wheel or even with MIDI commands sent from a external device like a foot controller. Keep in mind that as soon as you have some Cue-Points set in the song the scrolling will start to run anyway according to the Cue-Points set! |
||||||||||||||||||||||||||||||||||||||||||||||||
| Jump to start at end of song |
Usually when a song ends the leadsheet is placed back to its starting position. This behaviour can be switched off with this option, so that the last position of the leadsheet will be kept. | ||||||||||||||||||||||||||||||||||||||||||||||||
| Bitmap adjustment |
Here you can preset how the bitmaps will be adjusted to the
displaying window. Select one of the following options:
Any adjustment of bitmaps consumes some CPU power, so probably is better to use a graphic tool (like Irfan View) to optimize the size of your bitmaps once so that you can get rid of the adjustment at all. |
||||||||||||||||||||||||||||||||||||||||||||||||
| MIDI input device |
Here you can select a MIDI input device from which MIDI
messages should be received. MIDI input can be used to control SongBook with SYSEX or Channel Control messages or to use SongBook as MIDI transpose or merge unit. In the free version you can only select one MIDI input device, With a licensed version you can select mutiple input devices to use the MIDI merge functionality. If no MIDI interface is installed at all this will be displayed and the selection box is deactivated. |
||||||||||||||||||||||||||||||||||||||||||||||||
| MIDI output devices |
Here you can select all the MIDI output devices, on which the data received from the MIDI IN device(s) and from the internal MIDI file player, should be reflected (and eventually filtered).
On nearly any Windows device the Microsoft GS Wavetable SW Synth is present, even if there is no additional MIDI sound module installed. This can be used to play MIDI files withSongBook. However, the quality of the produced sounds is not really intoxicating. But also in this case you must activate the Microsoft GS Wavetable SW Synth in the MIDI output devices list. |
||||||||||||||||||||||||||||||||||||||||||||||||
| MIDI CLOCK Synchronization |
Here you can decide how he tempo bar should be synchronized.
|
||||||||||||||||||||||||||||||||||||||||||||||||
| Use MCI for MIDI output |
SongBook has its own powerful MIDI file player,
which also transmits synchronisation messages to the connected tone
generators. furthermore it is able to split the output to different
sound modules and to transpose the output. However: It is also possible to make use of the Windows
Multimedia Control interface (MCI) to play the MIDI files. |
||||||||||||||||||||||||||||||||||||||||||||||||
| MIDI filter and port mapper | This button is only visible when at least one MIDI input
device is installed. By clicking this button the configuration dialog for the MIDI filter and port mapper will be shown. |
||||||||||||||||||||||||||||||||||||||||||||||||
| SYSEX manufacturer ID |
In order to transmit the song number from a external MIDI file player (e.g. keyboard) you have to insert a SYSEX command in the MIDI file. According to the MIDI specifications every SYSEX command contains a Manufacturer ID and a Device ID. These ID's can be configured here. Many of the possible values between 1 and 127 for the manufacturer ID are reserved for the big companies like Yamaha, Roland, Korg etc. The ID 125 is a commonly unreserved ID which we can easily use. But if you want you can also use any other ID.
|
||||||||||||||||||||||||||||||||||||||||||||||||
| SYSEX device ID | |||||||||||||||||||||||||||||||||||||||||||||||||
| SYSEX song select command |
This field is purely informative. It shows the format of a SYSEX command used to load and start the actually loaded song from a external MIDI file player, if its file name follow he rules. So here you can for example mark and cut the command string with Ctrl+C and paste it with Ctrl+V in your individual MIDI sequencer application. If there is no song opened the command will be shown as follows: |
||||||||||||||||||||||||||||||||||||||||||||||||
| Bank Select MIDI Kanal | Alternatively you can also use BANK SELECT and PROGRAM
CHANGE messages to load and start a certain song. Here you can specify, on which MIDI channel this messages must be sent to achieve this functionality. If you don't use this function at all or you prefer to work with the more flexible SYSEX commands then it is highly recommended to set this field to Not Used. If you define a MIDI channel here you can also specify if the songs should only be loaded or if they should be started immediately.
|
||||||||||||||||||||||||||||||||||||||||||||||||
| Enable parallel audio and MIDI output |
Usually it makes no sense to play audio and MIDI files
simultaneously. Especially the synchronisation between
audio and MIDI is problematic. However, what is possible is the output of the sound via an audio file and in parallel a MIDI file with control commands for lighting and effects. Here the synchronisation is not so complicated. However, so that both of these options can be clicked in the menu, this option must be activated here! |
||||||||||||||||||||||||||||||||||||||||||||||||
| Lyrics | This button opens the configuration dialog to adjust the text display when using the MIDI karaoke function. | ||||||||||||||||||||||||||||||||||||||||||||||||
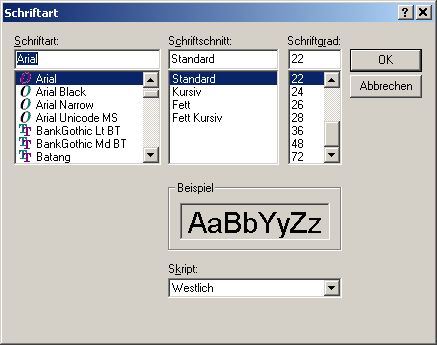
| Uhr | With a click on this button you can change the font and size for the clock, which is shown in the lower right corner of the SongBook window. | ||||||||||||||||||||||||||||||||||||||||||||||||
| SongBook NetWork | This button opens the configuration dialog for the SongBook NetWork. |
|
|
Some of the settings are saved separately for each
working directory! This allows you to use completely different setups if you play in 2 different bands, for example. It only gets really comfortable with the Setup Manager. |
|
|
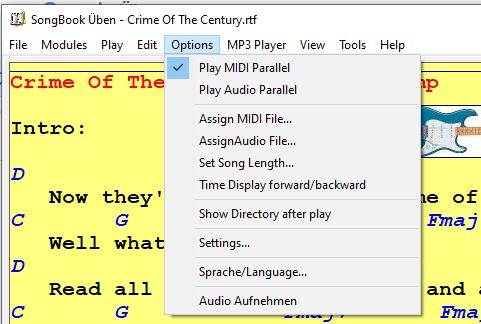
However, this menu function is only available if a MIDI file has been assigned to the current song and the option Play MIDI parallel is activated. |
This dialog is used to configure the lyric display for the Karaoke function.
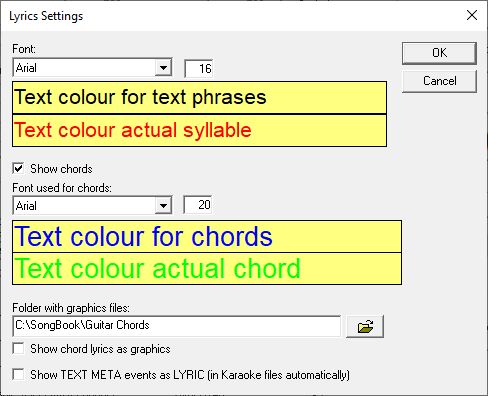
Simply click on one of the fields to change the corresponding parameter. As you can see, different fonts and sizes can be defined for chords and text passages.
| Show chords |
If this setting is activated, when playing MIDI files with the corresponding chord information, they will be displayed on the screen at the (hopefully) correct position in conjunction with the text. This setting is particularly interesting for combined singers / musicians. If the option is switched off, no chords are
displayed, even if they are present in the MIDI file. |
| Folder with graphics files |
In SongBook it is possible to include graphics in the display even in the Karaoke mode. It makes sense not to save the associated graphic files in the respective working folders. In order not to have to enter the full path name to the desired file for every graphic lyric, it is advisable to save the graphic files in a common folder and define this folder here. Then it is sufficient to only enter the actual name of the graphic file (without path). |
| Show chord lyrics as graphics |
With this function you can instruct SongBook to display appropriate graphics instead of the usual chord names (Gm7, D # sus4 etc.), e.g. Guitar chord symbols. Further information below under Chord lyrics as graphics. |
| Show TEXT META events as LYRIC | Some MIDI file manufacturers unfortunately do
not use the LYRIC meta events intended for the text
display, but normal TEXT meta events. This option must be activated so that the texts of such files are also displayed. Usually, in addition to the text, a heap of unnecessary crap is then displayed for the stage performance. But you can not have everything! |
If
the Show chords option is not activated, no chords will be
shown on the canvas, only the text lyrics. This
is probably the best setting for a pure singer.
For singers / instrumentalists it is probably useful to
activate the chord display.
The texts or sheet music to be displayed must be
made available in advance as bitmap files (BMP or JPG).
Like this e.g. can be done
with Microsoft Word is described in detail elsewhere.
It should be noted that the width of the bitmaps does not
become larger than the desired image section, which can still be
displayed on the device used. The height of the
bitmaps doesn't matter, just like the end credits.
In order not to get too large bitmap files, we recommend a
maximum color depth of 256 colors for BMP files.
|
|
If only the MIDI Karaoke functionality is to be used, no bitmap files need to be provided! |
As an alternative to the graphic files BMP and
JPG, text files (TXT) and RICH TEXT files (RTF,
only possible for registered users) and even PDF files (only
premium users) can be used!
In this case, the conversion into bitmap files can be
omitted.
The current table of contents is called up either by simply pressing the Enter key or by clicking on the corresponding button.
The program then searches in the current directory for all files with the
extension BMP, JPG or MID or KAR as
well as TXT and RTF (![]() ) and PDF (
) and PDF (![]() ) and displays the files found in a
list, divided into several columns. The last selected song in this
directory is automatically marked.
) and displays the files found in a
list, divided into several columns. The last selected song in this
directory is automatically marked.
Within the list, the display can be sorted by any column by simply
clicking on the corresponding column heading (e.g. Name).
To change the sorting order (ascending / descending) you can click on the
same column heading again.
Which column is currently sorted is indicated by a + (sorted in ascending
order) or a - (sorted in descending order) directly after the column name.
The width of the columns can be adjusted according to your wishes by positioning the mouse pointer exactly between 2 columns and then adjusting the column to the desired width while holding down the left mouse button. The column widths are saved when the table of contents is closed and the next time they are opened they are set as they were when the dialog was last closed.

| Closes the directory dialog and shows the previously opened song again. | |||||||||
| Song Nr. | The song number (if available in the file name) is displayed in
this column. This song number is expected by SongBook at
the beginning of the file name and consists of a set number and a
song number within the set. The two values must be separated by a
hyphen.
This song number does not necessarily have to be defined, but may make it easier to keep track of your own repertoire! |
||||||||
| Name | The name of the song is displayed here. Strictly speaking, this is the remaining file name (without song number). | ||||||||
| Type | Specifies the file type of the song file. | ||||||||
| Interpret | To assign an artist, double-click on the corresponding field (row and column Interpret). A simple dialog then opens in which the artist can either be typed in directly or be selected from a list of previously entered artists:  |
||||||||
| Last Played |
|||||||||
| Style |
|||||||||
| Here the view can be switched between all files and only marked
files. This is helpful to check which files were marked at the last
gig and can edit the corresponding songs. After correcting a song, the marking should then be deleted again! |
|||||||||
| Scrolls the list display up or down an entire page. Especially for touchscreen users better to use than the scroll bar in the list. | |||||||||
| MIDI file available |
This shows whether a MIDI file
has already been assigned to the selected song. In order to delete the assignment of a MIDI file to a song, the file selection box can be opened as described above and then closed immediately with Cancel. This will delete the assignment in the song and remove the corresponding check mark.
|
||||||||
| AUDIO file available |
This shows whether a Audio file
has already been assigned to the selected song. In order to delete the assignment of a Audio file to a song, the file selection box can be opened as described above and then closed immediately with Cancel. This will delete the assignment in the song and remove the corresponding check mark.
|
||||||||
| Open & Start | Opens the selected song, displays the bitmap file (or MIDI lyrics) on the canvas and starts the song. | ||||||||
| Init.-Sequenz | |||||||||
| Riffs | Opens the dialog for configuring any Audio riffs for the selected song. | ||||||||
| Open | Opens the selected song, displays the bitmap file (or MIDI lyrics) on the canvas. The song will not be started | ||||||||
|
|
Clicking this button opens the dialog for configuring the table of
contents.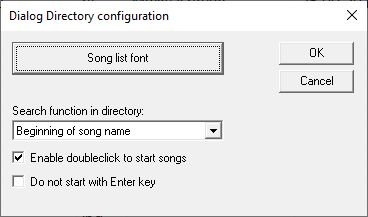
|
||||||||
|
|
Clicking this button opens the dialog for selecting
the current working directory. |
The current working directory is shown in a ComboBox control above the list. By opening the control element (with the mouse), the last 10 selected folders can be accessed directly. This is one of the few functions that are very difficult to use via the keyboard, but it can be done with a touch screen
Using the keyboard, a song can be searched by
its name by pressing the key with the first letter of the songs name. SongBook
then automatically jumps to the first song that begins with the
corresponding letter. If another button is pressed within 2 seconds, SongBook
searches for the first song that starts with the two letters typed
so far and so on and so on.
If no button is pressed for 2 seconds, the search can be started again by
e.g. another letter key is pressed.
To cancel the search function without waiting for the next 2 seconds, simply press the Delete button.
The directory and song numbers that precede the file names are ignored when navigating.
Instead of searching for letters at the beginning of the song name, the search function in the configuration of the dialog can be set so that any part of the song name can be typed in.
Searching in the table of contents is not limited to the song name, but can be set to one of the following columns using the list in the lower corner of the table of contents dialog:
Actual sort column
Song number
Name
Interpret
When searching in the song number, the hyphen is automatically inserted by the program if necessary. To select song 8 from set 5, simply enter 0508.
When the current song is selected and started, the program uses the song length and bitmap height to calculate the speed at which the credits have to run and starts to run the bitmap slowly from top to bottom.
|
|
To move the displayed bitmap vertically, point the mouse anywhere
on the bitmap and move the bitmap to the desired position while
holding down the left mouse button. Alternatively, the bitmap can also be moved with the cursor keys or with Page Up and Page Down. It is also possible to move the bitmap by turning the mouse wheel. |
When the end of the song is reached, the credits stop. The table of contents can then be displayed, which means that the next song can be selected immediately. This functionality can be set in the Options -> Settings dialog.
![]() This
step is not absolutely necessary if MIDI files with lyric events
(Karaoke function) are used .
This
step is not absolutely necessary if MIDI files with lyric events
(Karaoke function) are used .
The length of each song to be played must be
made known to the program once. To do this, you can either select the
corresponding menu function Options -> Set song
length or simply click on the display field for the song
length in the main screen.
The length of the currently open song can then be entered in minutes and
seconds in the dialog that opens.
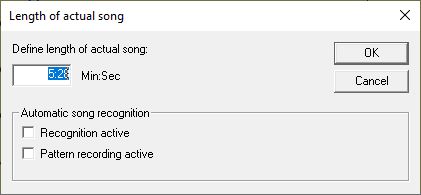
The entered value is saved with the song.
| Recognition active |
??? |
| Pattern recording active |
??? |
If a MIDI interface is connected and the songs are played, for example, by a hardware MIDI sequencer, the MIDI START event is evaluated and the song is automatically rewound.
It is possible to have the song number specified in the MIDI file, which is played by an external player, using a SYSEX command, which also automatically opens the correct song in SongBook! To integrate this SYSEX command into the MIDI file you need a corresponding sequencer program (Cubase, Logic, Reaper and what they are all called).
The SYSEX command has the following structure:
| Hexadecimal notation | F0,<Manufacturer ID>,<Device ID>,7F,<Set>,<Song>,F7 |
| Decimal notation | 240,<Manufacturer ID>,<Device ID>,127,<Set>,<Song>,247 |
The values to be entered for Manufacturer and
Device ID must correspond to the configuration in SongBook.
The corresponding set and song number must be entered for <Set>
and <Song>, of course in the correct spelling (hexadecimal
or decimal).
The songs can also be selected via MIDI controller
events. The desired set must be specified with the controllers CC32 (Bank
Select LSB) and CC0 (Bank Select MSB). The song within the set is
then selected with a PROGRAM CHANGE event and opened.
Note: The CC0 can also be omitted.
The corresponding values must be sent on the MIDI channel that was specified in the settings.
Each song can be assigned its own initialization sequence from MIDI data. In this sequence, for example, a drum computer can be initialized or a connected keyboard can be switched to a desired program.
|
|
The initialization sequence is sent to the desired MIDI OUT interfaces when the song is opened and not only when it is started! |
After clicking on the corresponding button in the table of contents, the sequence editor is opened, in which the data can be conveniently entered.
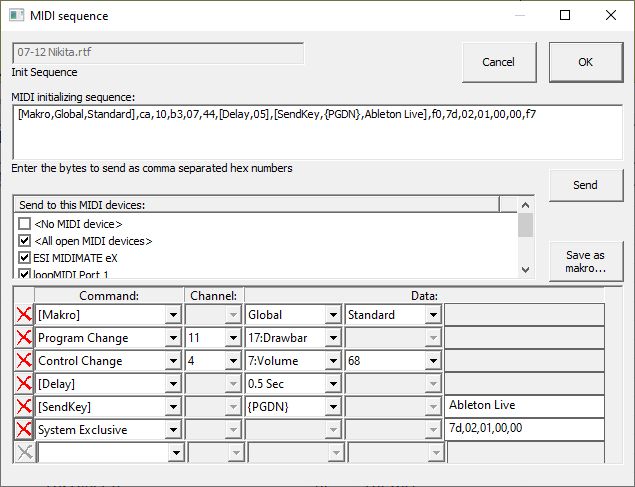
To enter a new command, it can simply be selected with the mouse in the
empty command field shown. Depending on the MIDI command, further
parameters must be defined, for example the MIDI channel and the
program number must be selected for a program change.
With system exclusive commands, the data to be sent (without BEGIN
SYSEX and END SYSEX) must be entered as hexadecimal
sequences of digits, each separated by a comma.
In this way, any sequence of MIDI commands can be put together.
To delete a command from the list, simply click on the button with the red cross.
With the Send button, the previously entered sequence can be output for test purposes.
If you click on an activated field in the Data column, an input dialog opens.
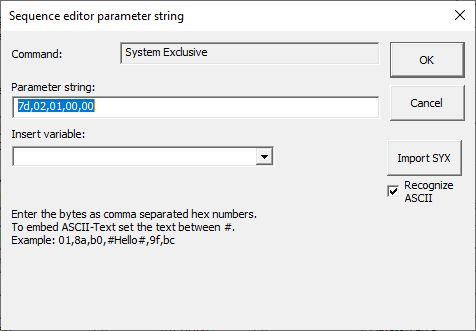
The data values can be entered here comfortably. An additional note is displayed for some data types.
The sequence can also be saved as a makro by clicking the corresponding button:
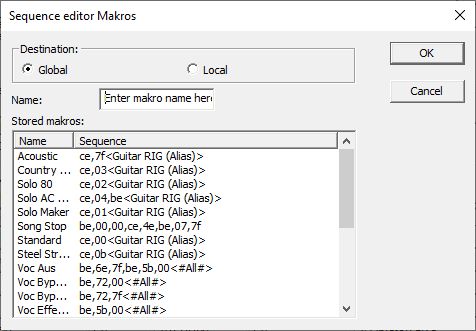
We differentiate between global and local makros.
| Global | Local |
| The globally saved makros are available in all folders. | The locally saved makros are only available in the current working folder. |
The saved macro can then be called up in other sequences with the [Makro] command.
In addition to the possible MIDI commands that can be used in an
initialization sequence, various special commands are also available.
These commands are not issued to any devices, but are used for internal
control on the PC.
| [Delay] | Wait a defined period of time before doing anything else in the program. |
| [SendKey] | With this command, a key press can be sent to another running program, just as if the corresponding key in that program were pressed directly. |
| [Makro] | A saved makro can be inserted here directly. |
| [Start App] | An external program can be started or activated with this command. In addition, you can determine how the started program should appear on the screen (normal, minimized, maximized, etc.). |
| [Program Option] | Various program options can be controlled here via sequences. It would go too far to list all possible options here. Just try. |
| [Control Pad] | The [Control Pad] command can be used to open a defined control pad or to close the
current control pad from which
this sequence was started. The name of the control pad to be opened must be entered in the data field. If the data field is left empty, the current control pad is closed. |
| [Jump] | Not yet implemented! |
Instead of prepared bitmap files, text files (extension .txt) can
also be stored in the directory and displayed.
When opening text files, SongBook automatically converts them to bitmaps
and displays them as such in order to maintain the functionality with the
cue points.
Lucida Console 14 is used as the font
for the import.
|
|
It naturally takes longer to open TXT files than with
simple bitmap files! If this becomes a problem, the only option is to use a graphics format or a faster computer. |
Instead of prepared bitmap files, rich text files (extension .rtf)
can also be stored in the directory and displayed.
The RTF format offers many advantages over a normal text file.
Different fonts and sizes and also different colors can be used.
However, SongBook does not support all formatting options of the RICH-TEXT format. For example, tables and graphics are not supported. If graphics are to be displayed in the text, appropriate empty areas must be provided in the file and the graphics must then be added as Popups in SongBook.
RTF files can be created with almost any word processing program.
It is only necessary to select RTF as the file type when saving
the file.
The already in Windows included WordPad application is very
suitable. Microsoft Word from the Office package works too, but
leaves tons of unnecessary information in the RTF files, which we
certainly don't need here. However, this information must be filtered out
accordingly when reading in and converting the file, which can lead to a
significantly longer loading time. It is advisable to open such files once
with WordPad and simply save them again.
|
|
It naturally takes longer to open RTFfiles than with simple bitmap
files! If this becomes a problem, the only option is to use a graphics format or a faster computer. |
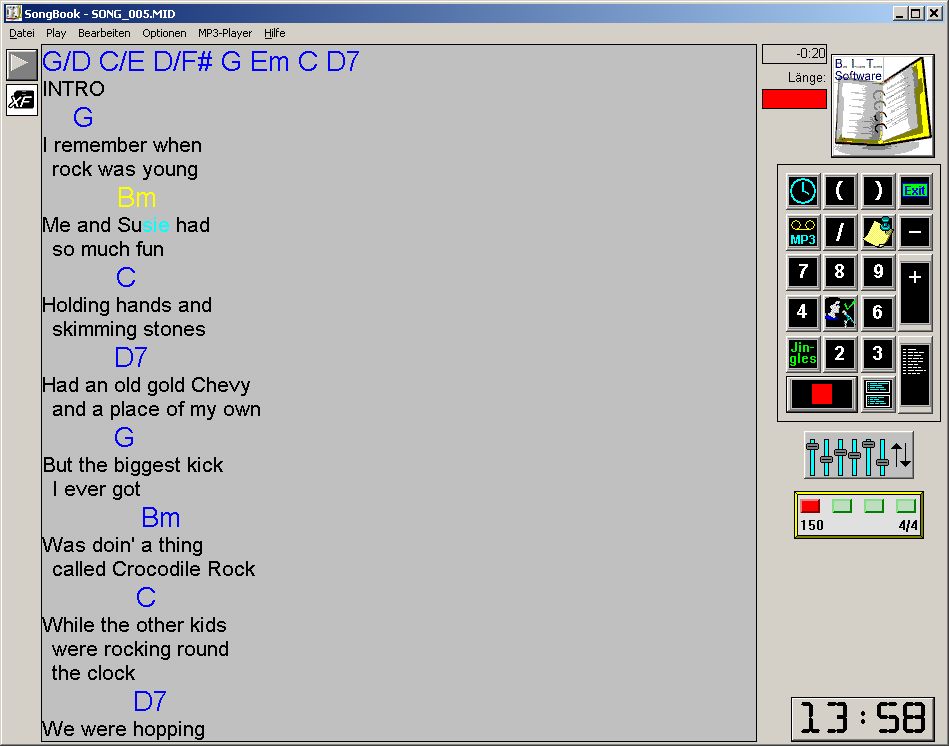
SongBook recognizes the chords by the fact that they are each on a separate line of text, which must have the color that is defined in the lyrics settings as the text color for chords.
Instead of prepared bitmap files, PDF files (extension .pdf)
can also be stored in the directory and displayed. I don't need to say a
word about the PDF format itself.
What is special, however, is that SongBook can also read multi-page
PDFs, provided that all pages in the document have the same width.
The pages are then automatically arranged one below the other by SongBook
and expanded into a correspondingly long bitmap.
The respective bitmap or text file can be displayed as a negative image via the menu item View -> Negative Picture, e.g. white on black instead of black on white.
|
|
The negative image display does not work with Karaoke files! |
The MIDI file player integrated in SongBook makes it possible to supply the connected sound module (s) with the MIDI data from SongBook. It is therefore no longer necessary to save the entire MIDI files on the sequencer. Especially with sequencers without a hard disk, you can save yourself the whole floppy juggling and use SongBook as a high-quality MIDI file player.
It is even possible to output the different MIDI channels to different sound generators, so you can, for example, output channel 10 to the super-sharp drum computer and the remaining sounds to the ultimate expander XY. It is even possible to transpose every single MIDI channel when it is output. Please also note the Signal Matrix in the appendix. The corresponding settings are made in the configuration of the MIDI filter and port mapper described below.
The MIDI file player in SongBook also sends MIDI START, STOP and TIMING CLOCK signals to synchronize the connected sound generators, but of course only if these are not filtered out in the subsequent MIDI filter.
Unfortunately, there are some MIDI-compatible devices on the market, but they hopelessly choke on the flood of MIDI data from time to time and hang up regularly. For example my old DigiTech RP-12 guitar processor.
So that such devices can work better, there is the possibility to connect the critical device to the MIDI output of the SongBook computer and to set the MIDI filter so that only the data that the device actually needs for its function passes through to the device. All other MIDI data will then be put to trahs in SongBook, so to speak.
The Port Mapper distributes the data received
on the MIDI-IN interfaces to any MIDI-OUT ports, whereby
it can be determined for each port which MIDI messages are to be
passed through and which are not.
The following graphic should illustrate the functionality of the Port
Mapper:

By installing an appropriate driver (e.g. Maple Virtual MIDI Cable from www.hurchalla.com), virtual ports can also be addressed, i.e. any software synth that runs on the same PC.
Of course, this function also makes sense if you are not using SongBook's MIDI player functionality, but rather a configuration that might look like this:
The dialog for configuring the MIDI filter can be accessed via the Options -> Settings dialog. There you have to click on the MIDI Filter and Portmapper button to get the following display:
With the selection list at the top of the window you can select the MIDI output port for which you want to define the filter values. If the interface was not activated in the higher-level dialog, this is shown here for information.
By default, all MIDI messages arriving at the MIDI input are passed through to the MIDI output. This can be seen from the fact that all corresponding checkmarks are set.
In order to filter certain MIDI messages and not to forward them
to the selected MIDI output, simply click on the corresponding
check mark.
In addition, the field Transpose can be used to determine whether
and by how much the issued notes should be transposed towards the
recipients. Positive and negative values are possible in semitone steps.
For example, the following configuration only allows channel messages for MIDI channel 15 and some system messages to pass through.
|
|
By clicking on one of the channel numbers in the channel messages,
all channel messages of the corresponding MIDI channel can
be switched on or off. Likewise, all option buttons can be switched on or off line by line by clicking on the corresponding line name (Note ON / OFF etc.). And if it is to be extremely extreme, all channel messages can be switched on or off by clicking on the label Channel. |
 MIDI Translators
 ![]()
Any number of translator commands can be defined per output device.
The output of the MIDI data can be influenced in many ways provided the MIDI files are output via the internal player.
|
|
The functions described below are not active when the MIDI files are played via the MCI. See also the Configuration chapter. |
The MIDI mixer is opened via the symbol ![]() . The following dialog appears:
. The following dialog appears:
|
|
The settings made here are saved with the song and set again the next time it is loaded. So all these parameters can be defined separately for each song. Cool or what? |
| Closes the MIDI Mixer. | |
| Song transposition | A general transpose of the output for each individual song can be
specified here. Of course, the drum track (channel 10) is excluded from the transposition. |
| Channel play parameters |
The settings for the MIDI channels (not tracks) are made
here. As is known, MIDI provides 16 channels. The velocity can be changed as a percentage for each of these channels. Percentages over 100% mean a louder output, while percentages under 100% make the channel output correspondingly quieter. If a value is entered that leads to an overload of the output, i.e. the required velocity of one or more notes in this channel would be over 127, the corresponding field is colored red. The notes that should be posted after the percentage conversion above 127 are then simply output with the maximum possible velocity of 127. In addition to being able to transpose the entire song, each individual channel can also be transposed here. This is very helpful when a certain instrument sounds too high or too low in a sound module or in order to adjust the vocal position to any vocalist track. |
| On the one hand, these symbols indicate whether vocal lines or
instrumental parts are output on the corresponding channels. In standard MIDI files, the main voice should actually be on channel 4 by default. However, this is by no means always the case. For karaoke songs, the main voice is often found on channel 1 or channel 3. It is also possible that additional vocal parts are played on different channels. Here you have the possibility to define for each individual MIDI channel whether it is vocal or instrumental parts. This is actually only required for the mute function for singing via the key 5 on the numeric keypad. To switch a channel, double-click on the corresponding symbol. A simple click on one of the symbols mutes the corresponding channel or not. Muted channels are identified by the overlaid no-parking sign. |
|
| Track play parameters |
The setting for the tracks (not channels) of the MIDI
file is made here. The number of tracks that SongBook can evaluate is not limited. With type 0 MIDI files there is only 1 track, which contains all data. Of course, the individual parts cannot be accessed there. Only the setting via the MIDI channels helps here. MIDI files of type 1 can contain any number of
tracks. For each of these tracks, the velocity can be changed as a
percentage. Percentages above 100% mean a louder output, while
percentages below 100% make the output of the track
correspondingly quieter. |
|
|
The settings made here are saved with the song and set again the next time it is loaded. So all these parameters can be defined separately for each song. Cool or what? |
|
|
If a song has no assigned MIDI file, the MIDI mixer cannot be used. |
|
|
With this option, you can also use SongBook as a training aid by simply muting the parts that you want to play yourself. |
With the Karaoke function, instead of a bitmap file, a MIDI or
karaoke file is stored in the directory, from which SongBook reads
all lyric meta events when it is opened and uses it to piece together the
text on the screen. When the song is played, the syllable to be singed is
highlighted in color.
To create a line break, a lyric meta event must be inserted with a slash
(/).
The tab character (>) familiar from the Yamaha XF format is
also supported, as is almost all XF-specific formatting.
This happens exactly the same with chords, provided that they are also
stored in the MIDI file and the Show chords option is
activated in the Lyric settings.
The chords can either be stored as lyric meta events, which must
then be put in brackets, or as Yamaha sequencer-specific meta events, such
as those used in XF format. Likewise, lyric meta events bracketed
in double quotation marks are interpreted as chord information, as are
events whose text begins with a % sign (this is used with Technics KN
keyboards).
Chord events must always be entered as individual lyric events and should
appear immediately after the associated syllable. Then SongBook can
link these chords with the respective syllable.
The following graphic shows an example of a karaoke display with chords:
The ![]() symbol
indicates that the currently open MIDI file is a file in the
Yamaha XF file format.
symbol
indicates that the currently open MIDI file is a file in the
Yamaha XF file format.
In addition to the text and chord lyrics that are displayed in the karaoke function, it is also possible to include graphics. This can e.g. Note fragments that can be displayed at the corresponding position.
These graphics are entered into the file as normal lyric or text meta events. To tell SongBook that a graphic should be displayed instead of the text, the name of the graphic file to be displayed, enclosed in # characters, is now defined as a lyric or text event.
Example:
"#graphicfile.jpg#"
The usual formats such as BMP, JPG, GIF etc. can be used as graphic files.
Either the full path to the file can be specified as the file name. If no path is specified, SongBook tries to find the graphic file in the folder that is defined as a Folder with graphic files in the Lyric settings. If it is not found there, SongBook assumes that the file is in the current working folder, which is not recommended, however, as in this case it may also appear in the song directory.
If the same graphic file is defined several times in a song, SongBook loads it only once into the memory and simply repeats it at the desired locations. This to save working space.
When the song file is closed, i.e. when another song is selected, the graphics are removed from the main memory.
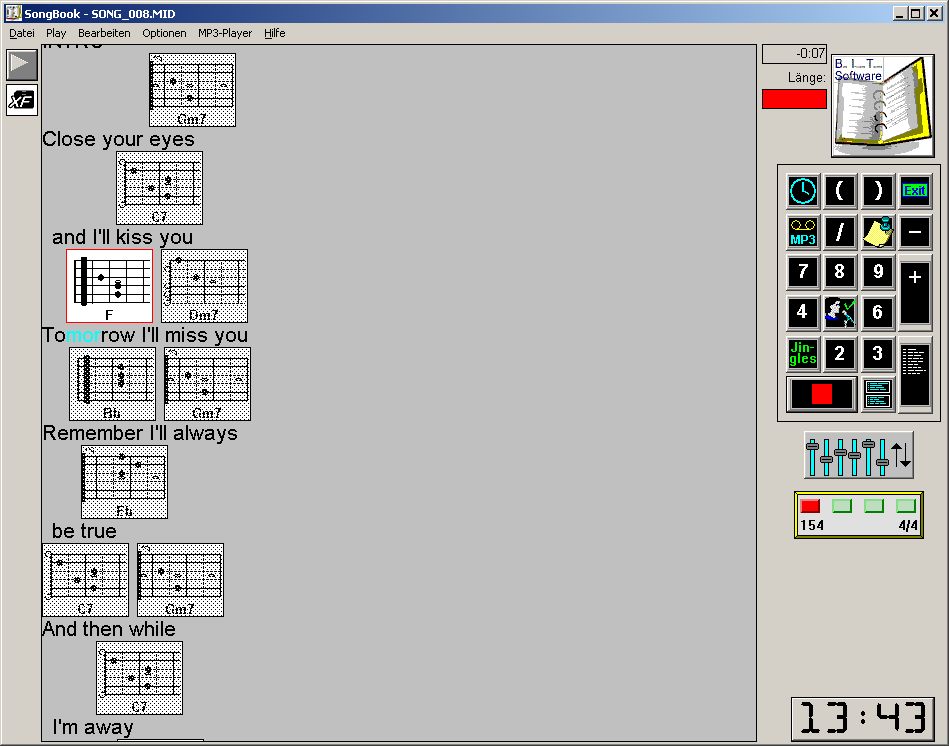
An absolute highlight of SongBook in the display of lyrics is
also the possibility to have corresponding graphics automatically
displayed by SongBook instead of the chord designation (Gm7,
D#sus4 etc). These can be guitar fingerprints, for example. When
installing SongBook, some such grip patterns are stored, which can
then be displayed if necessary. The chord currently being played is
highlighted. If no graphic file with the corresponding chord name is
found, SongBook displays the chord as text in the usual way.
If this function is used, the SongBook screen could look like this, for example:
The information about a specific lyric event can be called up by double-clicking on the desired event when the song is not running.
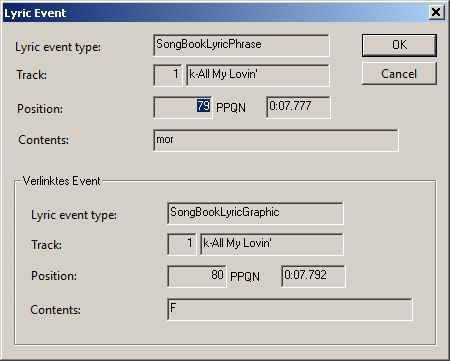
If the corresponding lyric event is linked to another event (chord to syllable or vice versa), the data of the linked event is also displayed.
|
|
To be able to access lyric events that are currently not in the visible area of the screen, simply mark a currently visible event with a click of the mouse and then use the arrow keys (cursor keys) to scroll left and right through the lyrics. |
Via the menu item File -> Save Lyrics As the content of the displayed Lyric window can be saved as a text or RTF file on the hard disk and subsequently processed as required.
SongBook can be used profitably not only on the stage, but also in the practice room.
Often you have to rehearse a certain sequence of a song several times, be it to rehearse a guitar solo or to refine a polyphonic vocal passage. Of course, it is not optimal here if you have to go through the whole song again and again.
This can be helped by positioning the mouse pointer on the desired position in the bitmap and pressing the right mouse button. In the context menu that appears, select the entry Start here. Now the song is played immediately from the current position. All control commands that are stored in the MIDI file before the current position are still executed, so that the programs and volumes of the individual channels should always be correct.
Often you have a CD or MP3 player with you in order to
sprinkle the audiance with light background music during your breaks.
SongBook also masters this task with flying colors.
For this purpose, any folder with MP3 files on the hard disk can be selected in the SongBook MP3 player. SongBook creates a playlist for the files in this folder in each selected folder. The files are then played back in order using this playlist to start again from the beginning after the last song.
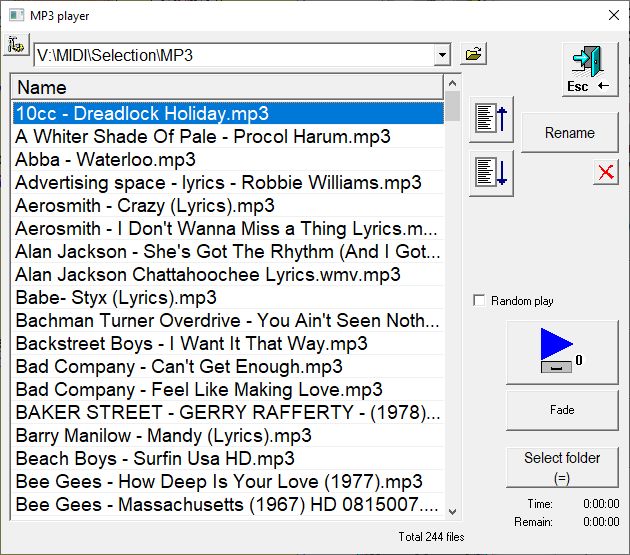
| Closes the MP3 player and displays the previously opened song again. | |||
| Rename | Allows you to rename an MP3 file for whatever reason. The corresponding change is also reflected in the playlist. | ||
  |
Starts or stops the marked MP3 song. | ||
| Random play | If this option is activated, the song selection takes place
according to a random pattern. SongBook automatically
ensures that the same song in the current directory is not played
twice within the same session. If the option is switched off, the output is in the order specified in the list. |
||
| Fade | By selecting a song and clicking this button, the new song is started immediately while the currently playing song continues. This causes a crossfade (as in the disco). | ||
|
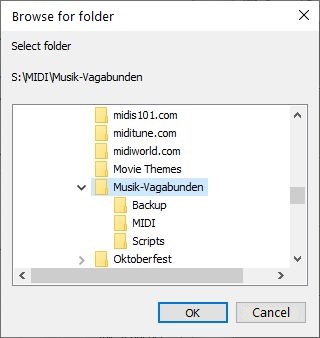
Select folder |
Clicking this button opens the dialog for selecting the current
working directory.
|
||
|
|
Moves the selected song up or down in the playlist each time you click the mouse. | ||
|
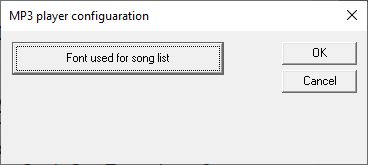
|
Clicking this button opens the dialog for configuring the MP3
player.
|
The current directory is shown in a ComboBox control above the list. By opening the control element (with the mouse), the last 10 selected folders can be accessed directly. This is one of the few functions that are very difficult to use using the keyboard.
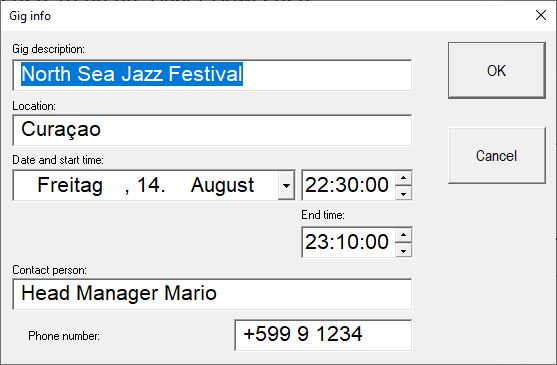
With this function all planned gigs can be recorded and called up at any
time. Various additional information about the events can be saved.
So you immediately know on the stage which club has now committed you and
is responsible to pay you.
The gig list can be accessed via the menu function Edit -> Gigs.
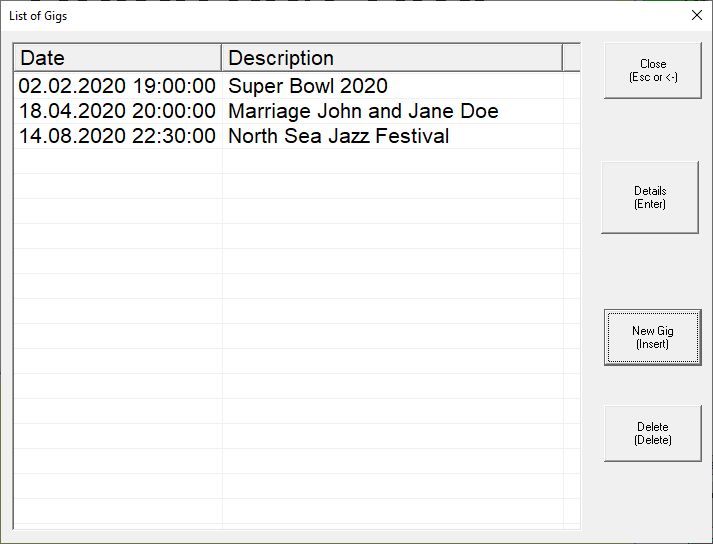
The desired event can now be selected with the cursor keys and the details displayed with the enter key:
This step is the most complex in the whole story.
There are many ways to create the bitmaps to be displayed. I myself create the bitmaps from the previously written Word documents and then piece them together with IrfanView.
The following steps are necessary:
Open the desired document with Word or your favorite word processor.
Mark the entire document content with Edit -> Mark All and copy it to the clipboard with Edit -> Copy.
Open the IrfanView program (if
not already open) and select the command Edit -> Paste.
Depending on the size of the document, however, not all of the content
is now displayed in IrfanView. In this case, copying in Word
and pasting in IrfanView must take place in several stages.
If you want to save the result as a BMP file, reduce the color depth with Image -> Reduce color depth to 256 colors. Yet another reduction to e.g. 16 colors means no great savings and can therefore be omitted.
Save the file with File -> Save As as a BMP or JPG file in the desired working folder.
For short lyrics, which are already in paper form, or corresponding sheet music, there is of course also the possibility to simply scan the corresponding paper documents and save them as BMP or JPG files.
This step is optional. The text display also works without assigned media files. However, to control the timing of a song file, it can still be useful to temporarily assign a MIDI or audio file.
If SongBook is used as the master and a connected sequencer is to be supplied with MIDI data, a MIDI file must of course be defined for the song.
After selecting the corresponding function Assign MIDI File or Assign Audio File in the Options section of the main menu, the well-known file selection box is displayed, which enables the user to search for a corresponding file on the hard disk and link it to the current song. Media files can also be assigned in the directory dialog by clicking the buttons MIDI file available and/or Audio file available.
Exactly one MIDI file and one audio file can be selected for each song. To play one of the two parallel to the text display, the corresponding option must be activated in the Options menu.
Only one of the two media files can be played
at a time. When you select one of the two options, the other is
automatically switched off.
However, this behavior can also be changed by activating the Enable
parallel audio and MIDI output option in the Options ->
Settings dialog, so that it is entirely possible to play an
audio file and a MIDI file at the same time.
As long as no cue points have been
defined in the song, the whole song runs at a fixed, computer-calculated
speed.
If there are longer instrumental passages in this song, this must be taken
into account when writing the lyrics with appropriate empty spaces,
otherwise it can happen that the text to be singed disappears from the
canvas before the corresponding solo is finished.
This mishap can now be countered by setting cue
points in the song at striking positions.
Each cue point contains the current playtime and the associated
position in the display bitmap.
The program can then sway from cue point to cue point.
Depending on the distance and time difference between two cue points,
the credits then run faster or slower in this area.
This means that there is no more need for any artificial gaps in the
bitmaps.
In order to manage the cue points, the corresponding option must be activated. The easiest way to do this is to use the corresponding button at the top right next to the canvas:
| |
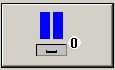
Cue point editing is not active (default setting). |
| |
Cue point editing is active. This is also indicated by a gray horizontal line in the middle of the text window. |
When playing songs, the cue points are evaluated regardless of whether the cue point management is activated or not.
|
|
To manage cue points, a mouse (or at least a touch To manage cue points, a mouse (or a touch screen screen) is essential!screen) is essential! |
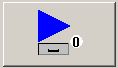
To set one or more cue points, the
song is started. The cursor shape changes to a triangle ![]() . If you click anywhere in the bitmap
while the song is playing, a cue point is set at the corresponding
point. This is indicated by a blue or red horizontal line at the right end
of which the time of the cue point is also indicated. It does not
depend on every single pixel, an approximate positioning is sufficient for
now.
. If you click anywhere in the bitmap
while the song is playing, a cue point is set at the corresponding
point. This is indicated by a blue or red horizontal line at the right end
of which the time of the cue point is also indicated. It does not
depend on every single pixel, an approximate positioning is sufficient for
now.
The following figure shows a sample song with some cue points set:
By the way: The gray line shows exactly the middle of the song window.
|
|
If the distance between 2 cue points is too large to
ensure a clean process, the corresponding cue point is
displayed in red! In this case, the step size when scrolling is automatically set larger when playing the song, which can cause the display to jerk. In this case it is recommended to define one or more additional cue points between the previous and the so-called critical cue point. |
To move a cue point in the vertical
position, point the mouse at the corresponding blue or red line when the
song has not started. As soon as the mouse pointer is close enough to the
line, it changes shape like ![]() . Now press the left mouse button and drag the
cursor to the desired position while holding down the mouse button. The
mouse button can be released there and the cue point is moved.
. Now press the left mouse button and drag the
cursor to the desired position while holding down the mouse button. The
mouse button can be released there and the cue point is moved.
|
|
To move the displayed bitmap vertically, point the mouse anywhere on the bitmap (only not on a cue point) and move the bitmap to the desired position while holding down the left mouse button. Alternatively, the bitmap can also be moved with the cursor keys or, even better, with the mouse wheel. |
To delete a previously set cue point,
point the mouse at the corresponding blue or red line when the song has
not started. As soon as the mouse pointer is close enough to the line, it
changes shape like ![]() . Now press the right (!) Mouse button to display a so-called
context menu for the cue point at the mouse position. In this menu
you now select the menu item Delete cue point.
. Now press the right (!) Mouse button to display a so-called
context menu for the cue point at the mouse position. In this menu
you now select the menu item Delete cue point.
It is also possible to change the time value of a cue point later. Here the mouse is placed on the cue point line as described above and the right mouse button is pressed. In the context menu, select the entry Edit cue point.
|
|
To open the editing dialog for a cue point, you can also double-click on the corresponding cue point line. |
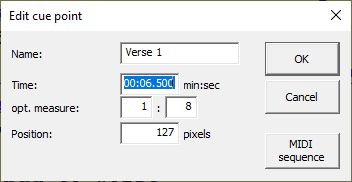
Both the position and the time of the cue point can now be changed here.
The already known sequence editor is opened via the MIDI sequence button and thus enables the input of a sequence that is sent when the song is played and the corresponding cue point is reached.
|
|
In the time display of the cue point lines, an appended asterisk (*) indicates when a MIDI sequence is assigned to a cue point. |
In the editable filed Name you can define a certain name for the actual cue point. This name will then also be displayed on the cue point line.
With popups, you have the option of
displaying additional graphics as pop-up windows at a specific
point in time during the running of a song at defined points.
For example, popups can be used to indicate which guitar pickup
would produce the best sound at any given time. Of course, this is just
one example of the endless possibilities.
In the following example, a popup is defined, which indicates that the neck pickup should be preferred.
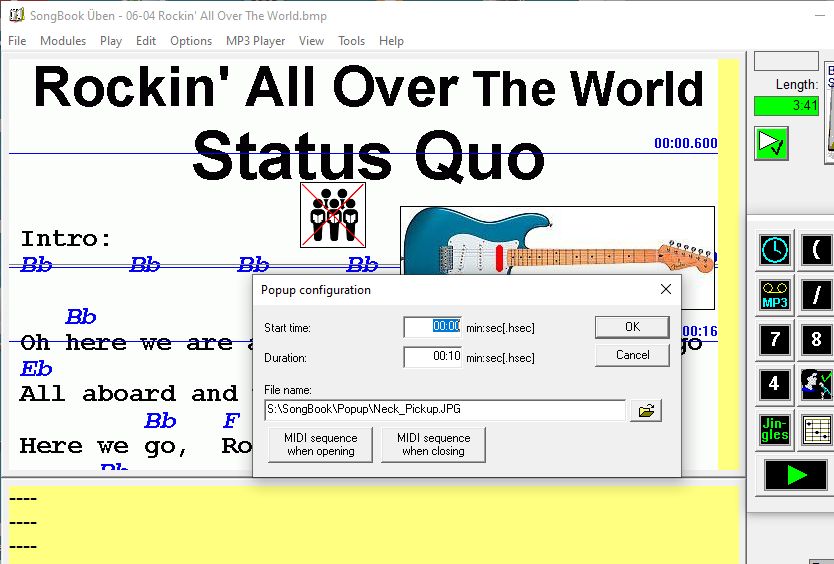
The popup in the example is configured so that it is displayed for 10 seconds after the song has started.
To create a new popup, point the
mouse at the desired location where the upper left corner of the popup
should appear and press the right mouse button. In the context menu
that appears, select the menu item Create Popup. The familiar
Windows file selection box appears in which you now have to select the graphic
file to be displayed in the popup.
The graphic is then immediately displayed at the marked point.
After the popup is created we can configure it. To do this, simply double-click on the popup to open the configuration dialog.
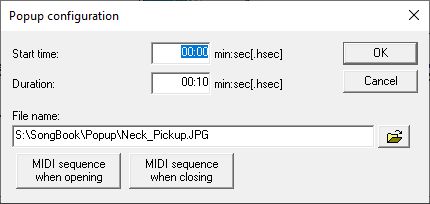
| Start time |
Here you can define when the popup should appear and
how long it should be displayed.
If the value 00:00 is entered in the Duration field, the popup remains visible throughout the entire duration of the song, apart from the fact that it may be scrolled out of the picture at some point. The times can be entered to the nearest thousandth of a second by simply adding the fraction of a second, separated by a decimal point, to the back. Example: 00:02.500 for 2.5 seconds |
| Duration | |
| Dateiname | By selecting a different file name, the displayed graphic of a popup can also be changed later. |
| MIDI sequence when opening | A MIDI sequence can be defined here, which is executed
when the popup is displayed. For example, at the beginning of a guitar solo, the guitar processor can be switched to a different sound. |
| MIDI sequence when closing | A MIDI sequence can be defined here, which is executed
when the popup is hidden again. For example, switch back to the original sound after the solo has ended. |
To move a popup, point the mouse into the popup (not directly into a corner) when the song is not running until the mouse pointer takes the form of a flat hand. Now move the popup to the desired position while holding down the left mouse button.
It is best to display the popup in
the original size of the image. This offers the best quality.
Nevertheless, it is possible to change the size of the popup window
and thereby stretch or compress the graphics it contains.
To do this, point the mouse at the bottom right corner of the popup until
the mouse pointer takes the form of a diagonal arrow. Then pull the corner
slowly while holding the left mouse button down to the desired size.
|
|
To bring a popup back to its original size, double-click in the lower right corner. |
An inadvertently inserted or no longer required popup can be easily deleted by pointing the mouse at the top right corner until the mouse pointer takes the form of a cross in a square. Clicking the left mouse button and confirming the security query displayed on it will delete the popup. The assigned graphic file is of course retained.
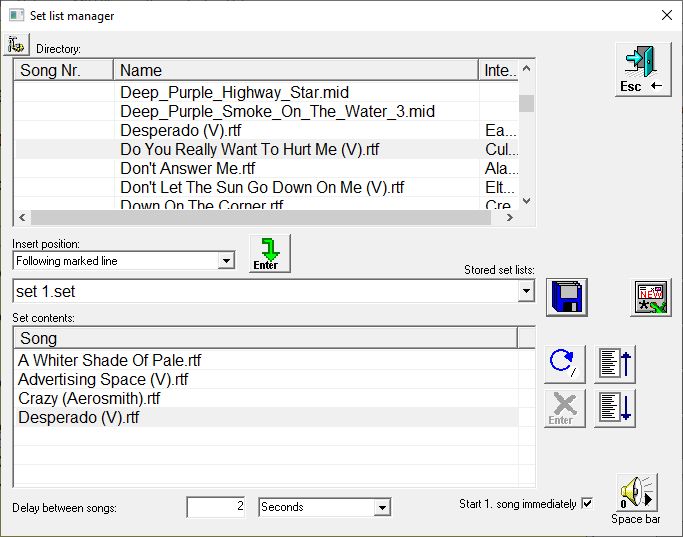
With the set list manager, any number of set lists can be compiled from the current working directory and saved on request under a catchy name. These set lists can then be called up and played again at lightning speed.
When playing, SongBook loads the songs in the order in which they were defined in the set list and plays one song after the other. A pause between the songs can be specified or SongBook waits for a start signal after each song to start the next song.
| Closes the set list management without starting the displayed set list. | |||||||||
| Directory | All songs in the current working folder are listed in this list. The set list can be compiled from all these songs. Here, as in the song directory, you can sort in ascending or descending order according to the different columns. |
||||||||
| Insert position | Here the operator can determine at which point in the current set
content a new song should be inserted. The following options are
available:
|
||||||||
| By clicking on this button or by pressing the Enter key, the song
currently selected in the directory is transferred to the set
list. At the same time, the next song in the directory list is marked. In this way, successive songs can be added to the set list simply by repeatedly executing this function. This function is only active if the Directory control is activated. This can be seen from the dark blue marking. The tab key is used to switch the selection between the various controls. |
|||||||||
| Every time this button is clicked or the / button is pressed, SongBook places the foremost song in the back of the displayed set list. So the list is scrolled, so to speak. | |||||||||
| Stored set lists |
The tab key is used to switch the selection between the various controls. |
||||||||
| Set contents |
This list lists the songs that have already been assigned to the set list. | ||||||||
| Clicking this button or pressing the Enter key removes the song
currently selected in the set content from the set list. This function is only active if the Set content control is activated. This can be seen from the dark blue marking. The tab key is used to switch the selection between the various controls. |
|||||||||
| Delay between songs | In this field you can specify how long the break between two songs
should last. A value of 0 ensures that the next song is loaded and displayed immediately after the end of a song. However, it will not start automatically. This is done by the yourself. The pause time can be specified in seconds or milliseconds! |
||||||||
| Clicking this button deletes the complete contents of the set
list. That means the actual set list becomes empty. If changes have been made to the currently displayed set list, the file selection dialog appears, in which the currently displayed list can be saved if required. |
|||||||||
| Start 1. song immediately |
This option is used to decide whether or not to automatically
start the first song in the set list when the set list is activated
using the |
||||||||
Clicking this button or pressing the 0 key or the space bar activates the currently displayed set list. |
|||||||||
|
|
Clicking this button opens the
dialog for configuring the set list manager dialog.

|
|
|
If a set list is active in the main screen, you can use the + and - buttons to scroll back and forth within the songs contained in the set list, rather than moving up and down in the directory. |
Jingles are (usually) short audio sequences that can be called up at the touch of a button, such as a pause sign or an fanfare or whatever.
Both audio files (WAV or MP3)
and MIDI files can be used as jingles in SongBook. There
are ![]() 10
(1 for non-registered users) memory locations available for jingles.
10
(1 for non-registered users) memory locations available for jingles.
The jingles are independent of the current working directory.
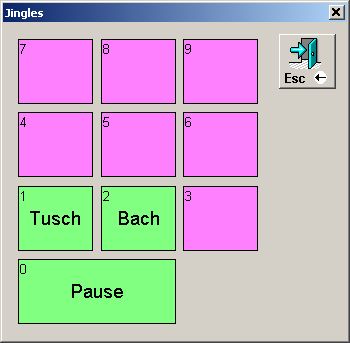
To play a jingle, just open the jingle
dialog using key 1 and then press the desired number key (0
to 9) of the jingle to be played.
The jingle starts after a very short delay and the dialog is
closed again.
Of course, the jingle can also be started using the mouse or via
the touch screen.
|
|
When playing MIDI jingles, all filter functions are temporarily switched off! |
To assign a jingle to a number key, open the jingle dialog (key 1) and then double-click on the desired jingle key button with the mouse. The Jingle configuration dialog then opens.
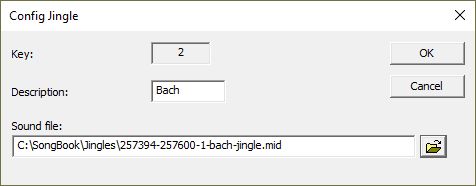
| Key | This shows which number key the jingle to be configured can be played with later. | ||
| Description | In this field you can give the jingle a short, concise name.
|
||
| Sound file |
A sound file must be assigned to each jingle. This can be
an audio file (WAV, MP3) or a MIDI file. The name of the currently assigned file is displayed in this input field. |
||
| Clicking this button opens the Windows file selection dialog, in which you can search for the sound file on the hard disk and assign it to the jingle by opening it. |
This tool helps you to locate problems in MIDI
transmission from a keyboard to SongBook and vice versa.
It shows whether MIDI data is received in SongBook at
all. Control commands are issued in plain text. Note data is not displayed
in order not to inflate the display unnecessarily.
You can also see which MIDI data is sent out from SongBook.
The MIDI sniffer is opened by pressing the key 9. Pressing the 9 key again closes the sniffer.
| IN |
Here you can choose whether the incoming MIDI data, the sent MIDI data or both should be displayed, although the unregistered user is unfortunately only offered IN. |
| Show | These checkboxes can be used to define which MIDI data should be tracked in the list and which should not. |
| MIDI Data | All received (and sent) MIDI messages are listed in these
2 lists. This includes the following MIDI data:
The last 500 messages are displayed, after which the oldest entry is deleted from the list for each incoming message. A single MIDI channel can also be selected directly below the settings for the events to be displayed. The events of all channels are listed by default. |
| CLOCK | Here the MIDI CLOCK signals are displayed (of course only
if a song is played on the keyboard). With each incoming CLOCK signal, the radio button is switched. |
| Active Sense | The Active Sense signals from the sending keyboard are
displayed here. These signals are typically transmitted by every MIDI
device every 300 milliseconds to indicate to the receiving
device that the device is still active and operating. The radio button is toggled with every incoming Active Sense signal. This is the easiest way to check whether the MIDI cabling between the keyboard and the SongBook PC is correct. If the connection is working, this radio button must flash permanently, provided the sending device sends Active Sense signals. SongBook itself does not send any Active Sense signals! |
Those users who use SongBook on stage and in the practice room or who play in several bands may have had to adjust the program settings accordingly each time they changed.
This can be easily avoided by saving the program settings as setup for each situation and then simply recalling the desired setup if necessary.
The corresponding function can be found in the File menu under the sensible name Save Setup. The following small dialog is displayed:

By clicking on the name of a setup that has already been saved, its name is copied into the input field and can be changed or adopted there if the corresponding setup is to be redefined.
Everything is saved under the setup name that is in the initialization file SongBook.ini.
The logical conclusion is the opposite of Save Setup and can therefore also be found in the File menu as Load Setup:
Simply select the desired setup here and confirm with OK.
The name of the currently loaded setup is displayed in the title bar of the program window. There it says, for example, SongBook practice room.
As is easy to see, setups that have already been saved can also be deleted by simply selecting the setup to be deleted and clicking the Delete Setup button.
Audio riffs are short audio sequences that can be mixed in while a song is playing. These can either be effects or previously recorded sequences. For example, a voice from a two-voice guitar solo could be recorded beforehand with a suitable recording program and integrated into the song as an audio riff. The guitarist then plays the other voice live on stage.
The triggering of the audio riffs takes place via MIDI controller commands, which either have to be stored in the MIDI file that SongBook is playing or that are preferably sent to SongBook from another device at the right time.
The audio riffs are already read into the main memory when the song file is opened, so that there are no delays in loading the audio files when the song is played.
The riffs are output via the standard device for sound reproduction, as defined in the control panel.
The riffs must be defined separately for each song. That is why the configuration is called up in the directory. There you have to mark the desired song with the mouse and then click the Riffs button to display the following dialog.
In order to delete an existing riff, the corresponding line must be marked and then click on the Delete button.
Clicking the New button displays the dialog for entering a new riff.
The necessary entries for the MIDI
channel, the controller number and the controller value
as well as the file name of an audio file (WAV or MP3)
must be specified here. When confirming with OK, SongBook
checks whether the entered values have not already been used,
otherwise a new line is entered in the definition of the riffs.
The configuration of the riffs is only saved when the configuration dialog
is closed with OK.
The idea behind the network is to synchronize
several SongBook PCs within the band or orchestra via a WLAN.
For example, when a band member opens, starts or stops a song, the
corresponding commands are passed on to the other PCs via the network.
The big advantage over a solution with
multiple screens on a single PC is that each band member can use their own
lead sheets. For example, the guitarist may have chords on his sheet that
are of little interest to the drummer. With appropriate popups, each
member can then make their personal assignments visible.
The possibilities are almost inexhaustible.
|
|
A separate registration is required for each computer that is to be used in the same SongBook NetWork! |
So that the computers can 'see' each other, a minimal configuration for SongBook NetWork is required.
The corresponding dialog is located under Options -> Settings. There you have to click on the SongBook NetWork button to open the following configuration dialog:
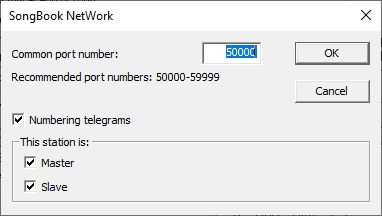
| Common port number |
A common port number for communication between the computers must be set on all computers that are to share the same network. Although values other than the recommended ones can also be set, this is not recommended. |
| Master | Here you can specify whether the respective station
should only receive recipients for commands or may also send
commands. For example, if only the band leader should select and start songs, then his PC must be defined as the master and all others as slaves. |
| Slave |
A display of all currently active NetWork participants can be called up via the menu item View -> SongBook NetWork:
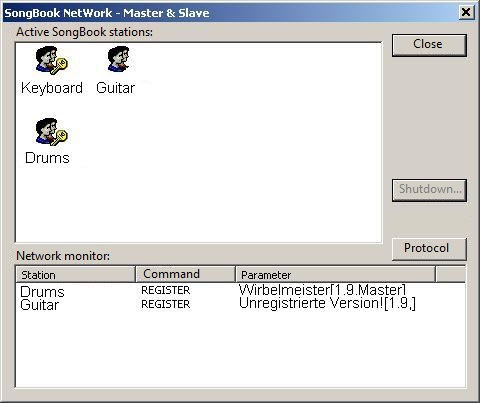
You can recognize the unregistered station by the fact that they have no key in the symbol. The stations are listed, but have no functionality in NetWork.
In the lower area of the window you can also see when one of the stations sends something.
It is even possible to end the SongBook program on one of the connected computers by marking the desired station with the mouse and then clicking on the Shutdown button. However, this is only possible if your own computer is configured as a SongBook NetWork Master.
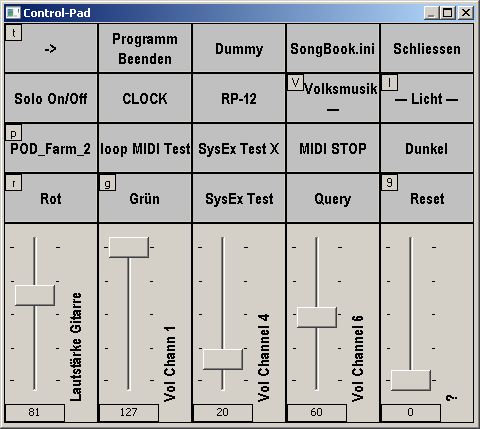
Control pads are a new powerful tool in SongBook.
A control pad is a matrix with buttons to which (MIDI) sequences and various program functions can be assigned.
In addition, an additional row of sliders can be displayed on request, with which MIDI controller values can be changed and sent on mouse or touch movement.
The maximum size of the matrix for a control pad is 50 rows of 50 columns, which theoretically corresponds to a total of 2500 possible buttons. The row of sliders is not included in the calculation. If that's not enough, you can open a control pad from within a control pad and open another control pad and another one and one more ...
You can imagine the whole thing like a freely configurable MIDI mixer with switches and sliders.
The main control pad is opened via the menu function View -> Control Pad or via the key ) or the key combination Ctrl + P.
The control pad can be positioned
anywhere on the screen and adjusted in size using the usual Windows
functions. If the pad is closed using the button  , its position and size are saved and restored the
next time it is opened.
, its position and size are saved and restored the
next time it is opened.
If a keyboard shortcut has been assigned to a button, it will be displayed
in the top left corner of the button.
The Settings menu item is in the control pad's system menu.
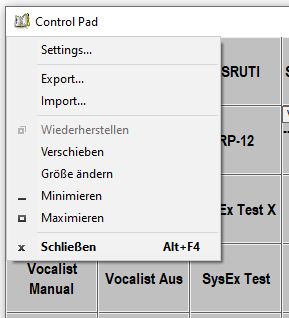
After selecting this menu item, the dialog for the configuration of the current control pad is displayed:

| Rows |
The number of rows (max. 50) and columns
(max. 50) and, if desired, the font for the button names are defined
here. The settings only apply to the current control pad. |
| Columns | |
| Add slider row | If this option is activated,
an additional row of sliders is displayed at the bottom of the control
pad. There are always as many sliders available as the number of columns defined. |
| Height | Sets the height of the slider row. This
height always remains the same, even when the control pad is
enlarged or reduced. The buttons above are automatically adjusted. |
| Breite | The width of the actual
controller can be defined here (depending on the user's finger width
;-). The rest is then used for the descriptive text. |
| Forward
shortcuts |
The Forward Shortcuts
option defines what should happen when a shortcut is pressed for a
button in this control pad. If the option is not active (default setting), the corresponding sequence is executed and the pressed key is ignored. f the option is activated, the pressed button is forwarded to the other open control pads and (if the option is active in the main control pad) also to the main program. So e.g. A button in the main control pad is assigned the key 8 as a shortcut, then when the key 8 is pressed, the corresponding sequence is first sent and then the key is passed on to the main program, which leads to a switch between full screen and normal display. |
| Font | Here you can specify the font
that will be used to label the buttons and sliders in this control
pad. If the selected font allows this, the names of the sliders are displayed vertically from bottom to top. |
Here we come to the key point.
In order to assign a corresponding sequence to a button in the control
pad, a double click on the button must be carried out,
whereupon, as expected, the already known sequence editor is
displayed.
In addition to the known functions of the sequence editor, there is also the option of assigning a shortcut (also called a hotkey) to a button by clicking on the corresponding Shortcut button.
When a key is pressed, the corresponding key code is intercepted and entered in the field provided.
SongBook does not check whether the same key code is used multiple times. When the corresponding key is pressed, the sequence of the first control found is simply executed. In addition, the shortcuts are of course only carried out when the corresponding control pad is opened.
If the same key is defined as a shortcut in several open control pads, the last opened pad always has priority. Depending on the setting of the pad (Forward shortcuts), only the sequence of the last opened pad is sent or that of the other open pads too.
In order to open another control pad from the (main) control pad, a corresponding sequence must be assigned to the desired button in which the required command is entered as shown:
A label for the button can be entered at the top. Here, of course, the motto applies: 'Be brief'
In the Command list select the option [Control Pad].
Then, in the Data field enter the label of the control pad to open as defined in its label field. If no control pad with this name exists it will be created automatically.
Control pads can be nested as required and organized according to topics, for example.
|
|
To close an open control pad using one of its buttons, proceed as shown and leave the data field for the name of the new control pad empty. |
To define a control pad as a table of contents, it is best
to define a new pad and then set it to the desired number of rows and 1 or
2 column sizes.
The corresponding buttons are then assigned sequences that contain the
following command ([Program Option], Load Song
and song file name):
For experienced premium users, there is the option of integrating a separate menu in SongBook via which any Wndows application can be started.
To achieve this a corresponding section must be set up in the SongBook.ini file:
[Tools]
Name=Additional tools
ToolMenuText1=<application name>
ToolStartPath1=<start in folder>
ToolPathName1=<applications executable path and file name>
ToolArguments1=<command line arguments>
ToolMenuText2=<application
name>
ToolStartPath2=<start
in folder>
ToolPathName2=<applications
executable path and file name>
ToolArguments2=<command
line arguments>
...
The defined applications are then listed in the order specified in the menu item with the corresponding name (Additional tools in the example) and can be started there as usual.
The Info page of SongBook is displayed via the menu function Help -> About SongBook or by clicking on the yellow ring binder symbol in the top right of the application window. You will notice that this is the same page that is briefly displayed when the program starts.
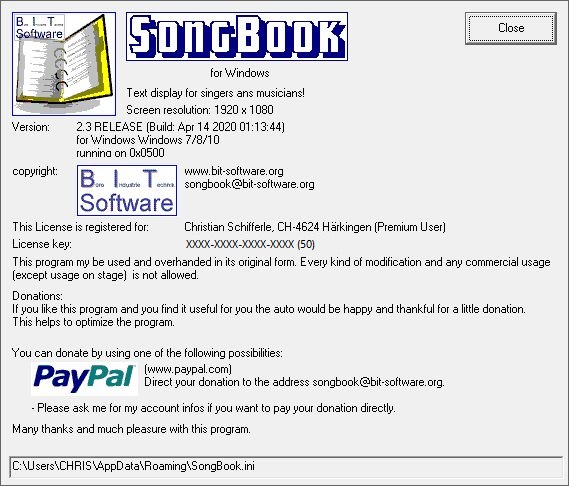
As can be seen from the Info page, I make the
program available to everyone free of charge. However, it is not permitted
to sell the program or parts of it in any profitable way! It is also not
permitted to change the program and resell the changed version!
To boost the motivation to donate a little, some of the extensive and
elaborately programmed functions starting from version 1.3 are only
available for registered users.
But if you think now that this program is a fine thing and I would like to honor the work of the programmer accordingly, I am happy about any voluntary contribution to expenses. You can then determine the amount of the donation yourself, depending on your financial options and the perceived value in use of the program.
If you want to make a donation or have
submitted it, it would also make sense to send me an email with your
details such as name, address, place of residence,
just like a kind of informal registration.
It could well be that in the future I will release an extended version
that will only be passed on to registered users.
I recommend using PayPal to transfer the donation. Such an account is opened quickly and payments are made very quickly and easily. In addition, the fees are lower than for a bank wire transfer across national borders.
|
|
Important note!
In the past, it was also possible to use moneybookers to pay. I have to advise against that. I deleted my moneybookers account because a brazen thief somehow found access to my account and paid practically all my credit into a lottery. moneybookers is unable to cancel such unlawful payments and accepts no responsibility. So: Stay away from moneybookers |
As a registered user you also have the following advantages:
Preferred treatment for support requests.
Announcement of new version and corrections.
More functionality (certain functions are only available to registered users)
As you have probably already noticed, there are several authorization levels starting from version 2.0.
The functions newly integrated as of version
2.0 are only available to premium users!
Of course, the full range of functions so far remains available for all registered
standard users. Likewise, subsequent error corrections to existing
functions do not lead to the loss of authorization for the corresponding
function.
The process is exactly the same as for a normal donation registration.
If the donated amount is 50 EUR (75 SFR / 75 USD) or more, you will be automatically registered as a premium user and will receive a corresponding registration key.
The transfer of the difference to the already paid donation amount is sufficient here. If you have already donated EUR 30 once, a further donation of EUR 20 is sufficient. You will then receive a new registration key.
are also welcome.
Please write a corresponding email to the email address shown in the info window.
In the case of error reports, please describe
as precisely as possible when exactly the error occurs and how it affects.
So not just "the display doesn't work".
It is best to briefly describe whether and how you can reproduce the
error. If it occurs in a specific MIDI file or the like, please
also send the file that triggers the error.
To benefit from all functions of the program you have to register as a user by transferring a donation to the author.
After the transfer, you will be sent an email
with your user name and a 4-part license number.
The application is actually registered by calling the Register function
in the Help menu.
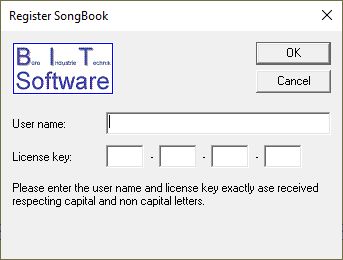
The license informations like user name and license key must be entered exactly as specified in the registration email. Upper / lower case and any punctuation marks must also be taken into account.
After entering the user name and license number, the program is registered.
There would still be many wishes for the further development of the program. But since I can only work on this program in my free time and, apart from that, it is more intended for use, many wishes still have to wait for its implementation.
However, the following possible additions and improvement options come to mind spontaneously:
It is conceivable to generate a click signal via an audio output, which can then be transmitted to the individual musicians via in-ear monitoring.
|
|
Falls du noch die ultimative Idee hast, was in SongBook
auf jeden Fall noch eingebaut werden müsste, dann schreib uns eine
Email an songbook@bit-software.org! |
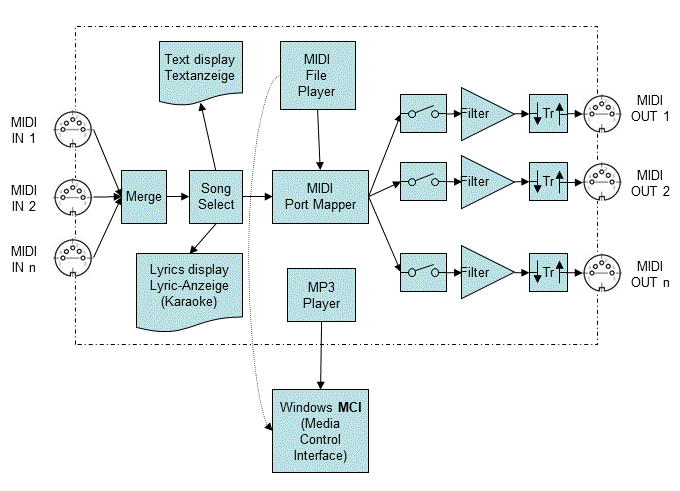
In the event of technical problems or specific questions, the menu item Support
Request can be selected via the Help menu. The
email client should then be automatically activated on your own computer
and a new email created.
In order to be able to analyze a technical problem in detail, we need
additional information. SongBook first saves these in the SongBook.support
file in the actual working directory (before starting the email client).
This file should be attached to the email.